~~~~~

~~~~~
Powered by Blogger.

~~Love is in the Air~~


posted by Unknown

No comments

 
It seems like I just took down my Christmas tree and already I am buying Valentines for my little man's school friends. I have to be honest about something.....I don't know if it is the fact that I love Christmas decorations so much and was sad to see them go, or if I love Valentines Day so much that I was excited to see it (I think it's a good mix of both) but I literally was putting up Valentines decor was I was taking down my tree. Our home feels bare with out some sort of crafty decor on the walls and tables. I also blame Pinterest for all their oh-so easy crafts! This post will definitely have some "I pinned it then I did it" crafts!
 
Anyway.....
If you need some inspiration for V-Day decor, look no further than this blog! (or Pinterest)
 
 
I am slightly addicted to wreath making.
 
 
I did not make this one above. I bought it post holiday at Target on clearance.


The ribbon wreath I made last year. It was so easy and fun!
I posted the link to the tutorial below. Note that she sews her. I just used little pins (like I always do) and made a mix of tear drop loops and circle loops and used two pins to secure them to the Styrofoam wreath form. It is so much easier than sewing!


I made the cupcake liner wreath this year for my front door. I love how full it turned out.
 
 
Here are the materials I used (and my little helpers hand:) a mix of about 60-70 cupcake liners, pins, tape, pink steamers to wrap around the wreath form
 
 
I wrapped the streamer around twice and taped to secure.

 
(the bag of goldfish are optional :)

 
Fold in half and then in half again. Then open it back up. I alternated the direction in which the print was pinned. No rhyme of reason, just what I thought looked best.

Secure the center with a pin or two. You could also hot glue. Since I had a little helper and my dog beside us I decided to pin and not use a glue gun.
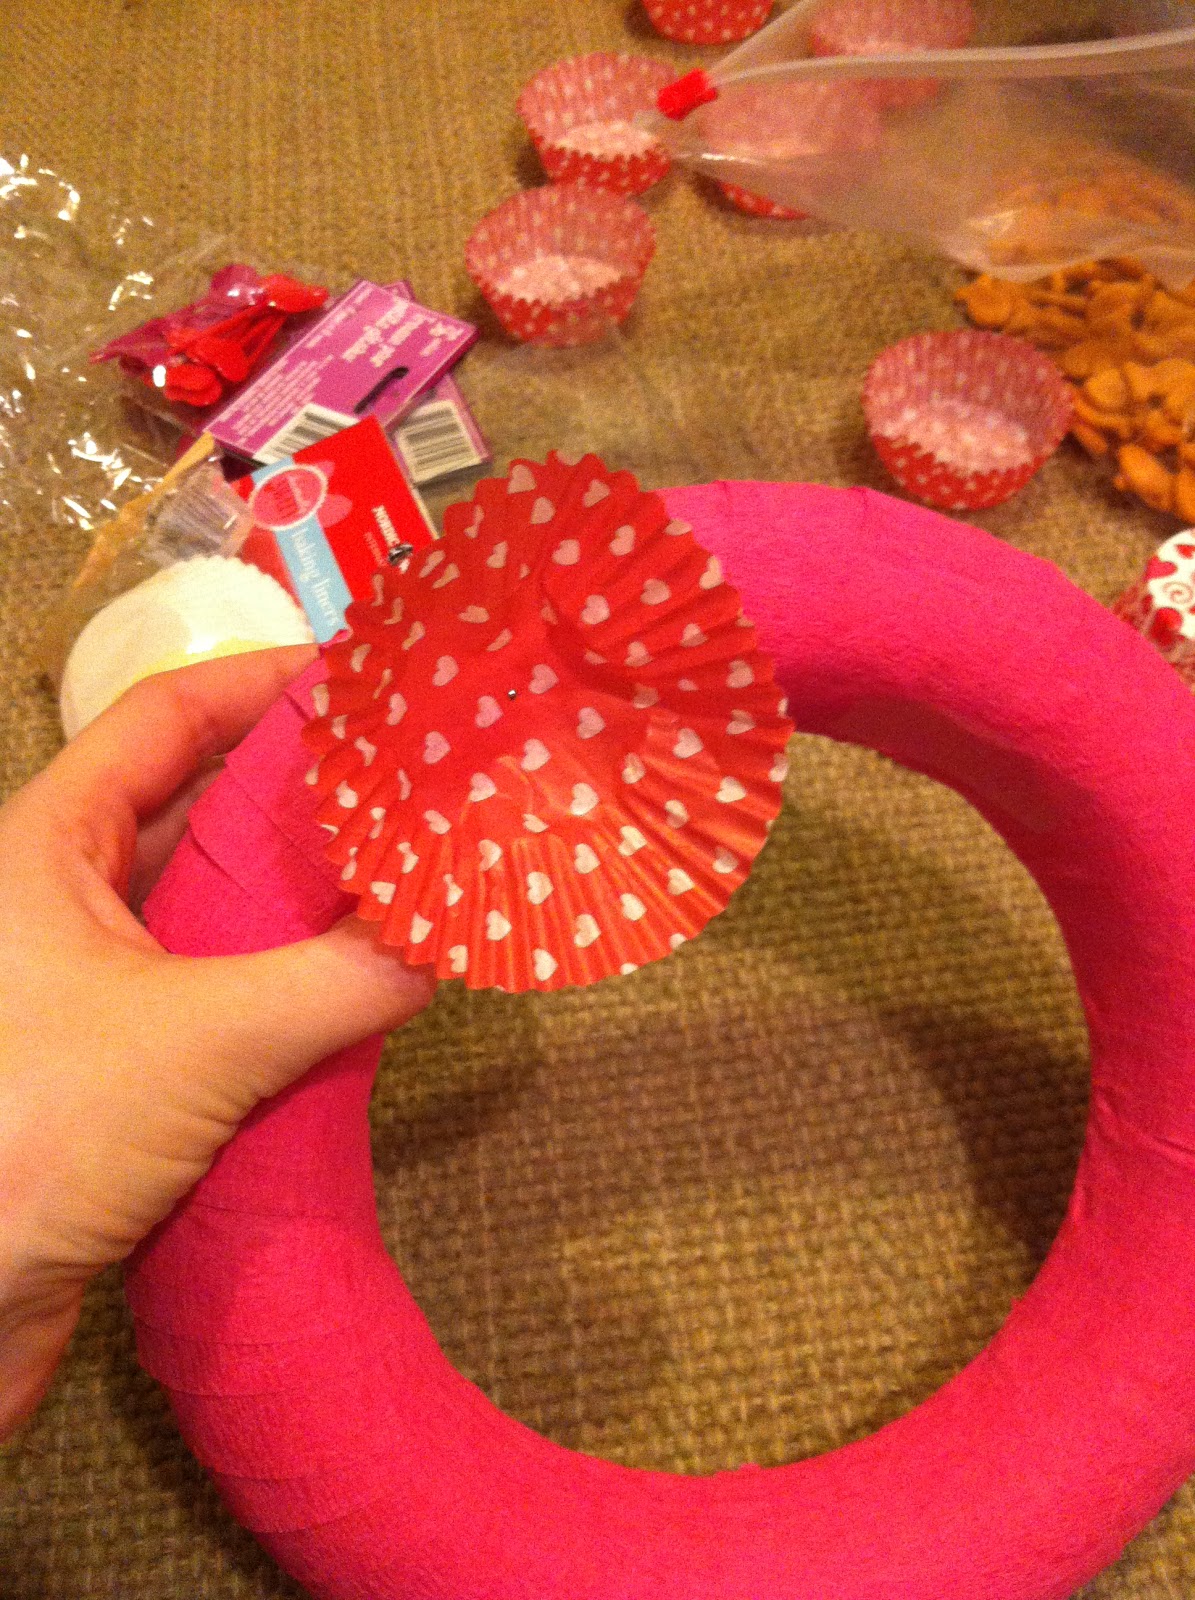
 
Then I pinned it to the Styrofoam wreath. This is when my camera died so I have no more "progress pictures". Just work on opposite sides of the wreath. top-bottom, left-right till it's as full as you like it! This is a flat back wreath form and I only did the front. Here is a close up.


If the yarn wreath looks familiar that's because I made it at Christmas time to go with my white and pink tree. I switched out the bow and added felt hearts. I just used small pins to nothing is permanent. Check out the tutorial HERE.

 
My "Kissing Balls" as I like to call them were another Pinterest craft from last year. Beware, these little things may look adorable and sweet but they take so long to make. Be prepared to hate streamers after this. But I love them and would probably do it again.
 
I also grabbed some of my bowls and let them rest in there (I like the different heights, I think it adds interest) and my OLD clearance salt and pepper shakers from Target...I always used them as display and this year they are love birds :)


Sorry for the boxes over the pictures.
 I didn't have the "OK" to put their faces on a public blog


I love my table scape oh so very much. I just used a table runner from Target clearance (I buy most all of my thing during the post holiday sales) reworked some flowers that I had and wrapped my picture frames with ribbon. (no ribbon or frames were harmed in the making and all I have to do is unwrap the ribbon when V-Day is over!) So easy!
 
 
This isn't the actual frame in the pictures below but
I just wanted to show you I just used a regular frame from the dollar store.
 
 
Just use tape to start and secure the ribbon. I didn't even have to cut my ribbon. Pay close attention to the corners. Make sure the tape is concealed in the back. Once you've wrapped it you can put the backing back on and secure that with tape if you need to. Every frame is different. No one can tell that I just used tape. Doing it this way the frame is not damaged and you can reuse the ribbon too!
 
 
I used wider ribbon with a print for this one. The frame underneath is so pretty on its own but is bronze and didn't look to romantic!
 
I love how all the colors came together. I also love to reuse things. I often use bowls or cups (or in this case a vintage tea pot) that I have in my pantry or china cabinet. It also allows me to fall in love with things that haven't been front and center for a while. Some things are leftovers from Christmas and some are things I will be able to use into the Spring.


My little kitchen table (which recently got a distressed makeover) is just happy as it can be. The "table runner" is actually 2 dishtowels from Marshall's along with the red polka dot dish towel folded on top. I got them on clearance a long time and when I was digging around to decor I thought "well those will work!" Tray was Target dollar bin, dollar store vase, Christmas beaded garland, and Dollar Store heart sticks. quick and easy!


Do you all remember these hangers? Did you all have them? My grandmal used to make them for us. These are a part of little man's teachers V-Day gifts. My mom made them. She tried to show me how, let's just say I'll leave this to her.


A few new additions this year are from the Target V-Day collection: I have always loved France and fell in love with the vintage-french-circus theme this year. And the colors go well in my kitchen. I snagged the tray, plates, and adorable mustache mug (for my son),wooden mustache heart sign, and LOVE sign all at Targee (That's french for Target:)


So I guess that's that! Check out the links to the crafts I made from Pinterest.
What do you love to make from Pinterest? What's your favorite Holiday to decorate? Let's hear it!

Links:

Ribbon Wreath

Kissing Balls

Yarn Wreath


Check out my other sites while your hanging out on the computer and follow me on Pinterest!


 Lots of LOVE and a Happy (very early:) Valentines Day!
 
-A

Happy New Year & I Pinned it then I Did it!


posted by Unknown

No comments

Hello All!
 
Wow what a great holiday break this has been. I have so enjoyed being able to stay home with my little man. We have been doing so many fun things. It got cold quick here is Louisville and I have to admit we didn't go out as much as I had hoped what we had a lot of fun staying in and lounging around in our Christmas pajamas, making forts, art work, Valentines Day decorations.
 
I am so excited for what 2013 has in store. I am setting a few goals for myself. Since I started being a stay at home mom/working from home/blogger which coincided with the holidays/cold weather/good food I have added 10 pounds to my waist line. I'm not too mad at myself. Since my son was born I lost about 75 pounds (all of which had been gained during pregnancy-won't let that happen next time!) Anyway, it was all perfect timing. Getting used to a new schedule, staying indoors more, cooking more because I was home! It was inevitable right? :) Well I am going to get those 10 pounds off my butt and also get rid of another 5 pounds just for giggles. I would like to see if I can make it down that far. I don't remember the last time I would have weighted that much (or weighted that little as I like to think) Luckily I have a dear friend Ashely who was kind enough to give me some tips and I have Pinterest (who needs anything else) Ashley is a personal trainer and a genius at body transformation. We had a nice long chat yesterday so I am ready to lose those lbs I put on while staying home!
 
I am also excited about my career! Boy how things can change in just a few month. Another good friend of mine Haley is moving home (from Jacksonville FL) to Ohio. She is also a makeup artist who started a business called Simply Makeup. Which is a team of oober talented women who make other women look and feel awesome (bet job ever!) which is what I do (as you all know) So Simply Makeup want to continue to run their successful business is Florida while Haley expands it in Ohio and I am ecstatic to announce that I am going to help expand it into Louisville. Haley, myself and the entire Simply Makeup team are so excited to be able to do this. I am excited (I am saying that a lot huh?) to build a team of talented people here in Louisville so we can have the best makeup team this city has ever seen. This is what my plan was all along when I quit the bank and starting working like this. I have admired what Haley and Simply Makeup has done in Florida and I'm stoked to take what she has built and as a team help it grow and prosper in Louisville. It's perfect timing for both of us! It's the best of both world. I will still be available as an individual freelance makeup artist so that I can hold classes, do editorial makeup, film, and so on. It really is great. Louisville has nothing like this and I am so excited to be a part of making Simply Makeup rock this ton socks off!
 
So that's whats been going on in the few days since Christmas! We have so much to look forward to in the new year!
 
On another note, I have decided to start a "I pinned it then I did it" section to the blog. I will be trying things out that I see of Pinterest or that are inspired by Pinterest and blogging about them so you can try them too! (kind of like my wreath I posted a while back) Which I have now changed up for Valentines day. All I did was remove the bow and pin and tape on felt hearts. So cute! I tried to upload a picture for you but there is something wrong with blogger. Boo. Ill try again soon! If you all have any suggestions please let me know. Follow me on Pinterest so you can see what I love and I can see what you love!


Well off to clean the house.

Make sure you check out all the fun stuff going on with my other sites!


&


Everyone have a beautiful day!
-A

Holidays


posted by Unknown

No comments

 
I hope everyone enjoyed their Holidays. We had a wonderful Christmas. I have been taking a little break from the blog to enjoy these two weeks that my son has out of school. We had such a blessed Christmas. We have been having a lot of fun staying at home and building forts, baking cookies, and celebrating the birth of Jesus. He has really enjoyed being home but I hope he will be excited to go back to school.
 
 
Here is a glimpse of our Christmas!
 
 
My girly tree!

Cupcakes

Hello little birdy

I love polka dots


The little man is also enjoying all his presents. He got way too many. He is the only grandchild so he is spoiled! He is really enjoying his Furby! I wasn't too excited about him getting one because I was worried I was going to have to be the one to feed him and take care of him! (Have you all seen these things, they have a mind of their own! It's crazy!)

I was very excited to receive my gift from my boyfriend but I will post on that later ;)
 

Little Man looking at all of his presents 
 
Pirate Ship form Grandad

He loves Twilight, even though he has never seen it!

The Lorax

Santa ate all his cookies and drank all his milk

Earlier in December, our Elf Elvin brought back a letter from Santa


 It was nice to spend time with our families and it was a very relaxing day!


Family Tree
 
Santa Came!
 
I love displaying my vintage ornaments
 
Moms present that I wrapped for our gift wrapping competition
 
I made the blue bow by hand and it's huge.
 I sat it beside a normal sized bow just so you could see!

Our Christmas PJ's
(Little man in stripes, me in green with Santa, and my man in HOHOHO's pants)
 
We are now looking forward to the New Year and taking a quick trip to Tennessee to see my dad and grandmother. I will be back in full force soon with the blog/reviews/tutorials/and BIG NEWS! But right now I am just enjoying this time off with my family. I hope you are too!

From my family to yours Merry Christmas and a Happy New Year!
 
-A

R & R - Recycle & Repurpose


posted by Unknown

2 comments

Hey Everyone
 
Sorry I haven't been posting as much I am busy getting ready for Christmas! Hope your Holidays are going well. 
 
I recently got a few new brushes which I am excited to share with you soon! There was only one problem....
I didn't have any place to put them. I didn't want to just use any old thing (although some nice vintage canisters would be nice but since it was 11:00 at night I didn't think I'd be going out to the Peddlers Mall. And I'm Miss Impatient and I wanted my new brushes nicely displayed on my vanity ASAP! So here is what I did.....I used old candle jars. I sure am glad I saved them!
 
The particular candle jars I used (and are best for this particular craft) are the ones from Bath & Body Works. I just love their candles! The jars are nice and simple and the perfect height for my brushes.
 
 
Before
 
If you don't want to use them for brushes and are going to repurpose them to store things in keep the lids! They are great lids!
 
Why do I love this?

1. Because I am using something I already have
2. Because they are the perfect size
3. Because I don't have throw away the great candle wax (I use that too)
4. They can be used for SO many things!
5. It's super easy!


Here is what you'll need:

Old Candle Jar
Scissors
Baking Soda (optional but well worth it)
Scrubbing pad or brush
Plastic snack bag
 
I don't have any pictures of the actual process because this post was an after thought, I'm sorry! But Ill be descriptive.
 
  1. Have a seat, take a load off! Take your scissors and cut at the wax. Just keep cutting till all the wax is pretty much removed from the jar. I started cutting the wax so it looked like slices of pie and then cut them vertically and horizontally so I got nice little chunks.
  2. The left over wick should pop right out. I just used my scissors to pry them loose.
  3. Once you have most of the wax loose just dump it in a little snack size zip lock bag.
  4.  Remove the candle label from the jar and stick it on the bag so you know what scent it is. (These particular labels were super easy to remove)
  5. Start washing out the wax.
  6. Add some baking soda and start scrubbing the wax residue off the jar. The baking soda helps break down the residue and stickiness. This is also a good time to remove the sticker from the bottom too...it's a little tougher than the outside label.
  7.  Keep scrubbing till you feel like it's clean enough
  8.  Dry with a paper towel
After
(the jar on the left is a candle jar too, it was a Halloween candle
and I liked the orange so I kept it.)
 
I wasn't too worried about them being spotless and shiny because they are going to be around makeup all the time but if you want them shiny and sparkling I would clean with some Windex too!
 

Save the leftover wax in the bags and use them for all sorts of things:
 
  • Poke little holes in the bag and place in closets or drawers
  • Poke little holes and place under the seat of your car (although if it got too hot in the car it might melt?)
  • Or do what I did and place them in a wax burner (mine is from Scentsy and it doesn't require a candle)


Use the jars for whatever you would like. I think they would be great for:
  • q-tip
  • cotton balls
  • paper clips
  • bobby pins
  • tiny collectibles
  • brushes
  • lipliner/eyeliner

Do you have any other ideas for what they would be great uses for?
 Share it with us!

So that's it. It's that simple!

Thanks for stopping by. Hope you liked it! If so, share it, pin it, like it, but most of all TRY IT!

Check out my other sites too!


 &


Thanks again and have a Beautiful Day!
 
-A


Christmas Craftiness


posted by Unknown

No comments

 CHRISTMAS IS ALMOST HERE
Time for some crafts!

We all wear many hats and this is the place where I like to hang those hats. Since Christmas is right around the corner I decided to once again pick up a hobby of mine. (I have a lot more time to now that I am staying at home.) I love to make wreathes! I love to buy wreaths! Thanks to Pinterest I have started making more than I buy! I was at good ol Target the other day and I saw this wreath for sale. I thought it was super cute. It's $20.00 which isn't horrible but when you look at it's just a bunch of yarn wrapped around a wreath form. I thought to myself

 "self-you have all of these materials at home. Go make it girl!"
 
And that's exactly what I did. Wanna know how...so you can make this cute wreath too? It doesn't take long at all and is great to sit in front of the TV and watch your favorite show while doing it. (I happened to be watching "Bill and Gulianna" on the Style Network. It was the episode where their son is born. Cry fest!!!! I set in tears as I made my wreath. Good tears though. Birth is such a beautiful thing. Anyway....on to  super easy cute crafting!


Supplies:

1 foam wreath form
Scissors
Yarn (about 4-5 colors)
Hot Glue Gun
1 Piece of Felt

I got my wreath form from the dollar bin at Target 1/2 off for a grand total of....

50 CENTS!-Gotta love that

Normally when I am making a light weight wreath that uses a foam form I just go to Home Depot and pick up some plumbing foam insulation things. (I don't know the technical term) They are just long pieces of foam to go around pipes and I cut the length I want and duck tape it together to make a circle. So much cheaper!!!

First you need to decide what colors you want to stand out the most. I used 5 Colors but you could really use as little or as much as you want. The colors you want to be the most vibrant will be applied last. I wanted the green and red to stand out because it is a Christmas wreath.

I wrapped the white first then pink, blue, green, and finally red.
Once you are finished if you feel like you need a little boost of one of the first colors you can always cut a good size piece of yarn and wrap it around but make sure its spaced apart. I would hold the wreath far back from me to see where the balance of colors was needed.


How easy is that!!!!
Think of all of possibilities and all the different colors you could use!

The Bow:

I made my bow out of felt. I wanted to keep with the yarn feel and I didn't feel like a velvet bow or store bought Christmas bow would look as "crafty". Feel free to use whatever bow you would like! This bow is sooooo simple to make!

I cut the felt into 5 strips. 4 of them are the same width and you can make the 5th one slightly skinner if you want. 

 
(You will need 5 strips even though I only took a picture of 4)

 
Take 2 of the strips and fold them in half to make the loops of the bow.
 I just stapled mine together

 
Take the thinner strip and wrap it around the two loops you made.


You can hot glue the felt together but for the sake of this tutorial and the fact that I was on my bed with my 5 year old watching Disney I didn't have my glue gun plugged in so I just pinned it which worked well too!

 
The other two stripes I pinned to the back and then I pinned it to my wreath! Super easy and fast!

 
You could make different sizes and different colors. It was really simple and easy to make and was a lot cheaper than the one at Target!


Well that's all for today! I hope you all like the "CRAFT" addition of the blog. If you all try this out let me know. I'd love to hear how it goes and see your wreaths!
 
Share the love with your crafty friends and pin this to Pinterest! You can also check out my other sites!
 
 
&


Thanks and have a Beautiful Day!
-A